OAuth 2.0 인증 가이드
카페24 API는 OAuth 2.0 기반의 보안 인증 시스템을 제공합니다. 이 가이드에서는 각 단계별 인증 방식과 토큰 관리 방법을 자세히 설명합니다.
📚 목차
- OAuth 2.0 개요
- 인증 흐름도
- Step 1: 인증 코드 요청
- Step 2: Access Token 발급
- Step 3: API 호출
- 토큰 갱신
- 토큰 폐기
- API별 인증 방식
- Security Best Practices
- 에러 처리 및 트러블슈팅
- 프로덕션 체크리스트
🔑 OAuth 2.0 개요
OAuth 2.0은 사용자의 인증 정보를 직접 공유하지 않고도 제3자 애플리케이션이 API에 안전하게 접근할 수 있는 개방형 표준입니다.
주요 특징
- 보안성: 사용자 비밀번호를 공개하지 않음
- 권한 제어: Scope를 통한 세밀한 권한 관리
- 토큰 기반: 일시적인 Access Token 사용
- 갱신 가능: Refresh Token으로 자동 갱신
핵심 용어
| 용어 | 설명 |
|---|---|
| Resource Owner | 쇼핑몰 관리자 (최종 사용자) |
| Client | 카페24 앱스토어에 등록된 애플리케이션 |
| Authorization Server | 카페24 OAuth 서버 |
| Resource Server | 카페24 API 서버 |
| Access Token | API 접근 권한을 나타내는 임시 토큰 |
| Refresh Token | Access Token 갱신용 토큰 |
| Scope | 토큰이 가진 권한 범위 |
| Authorization Code | 임시 인증 코드 (1분 유효) |
🔄 인증 흐름도
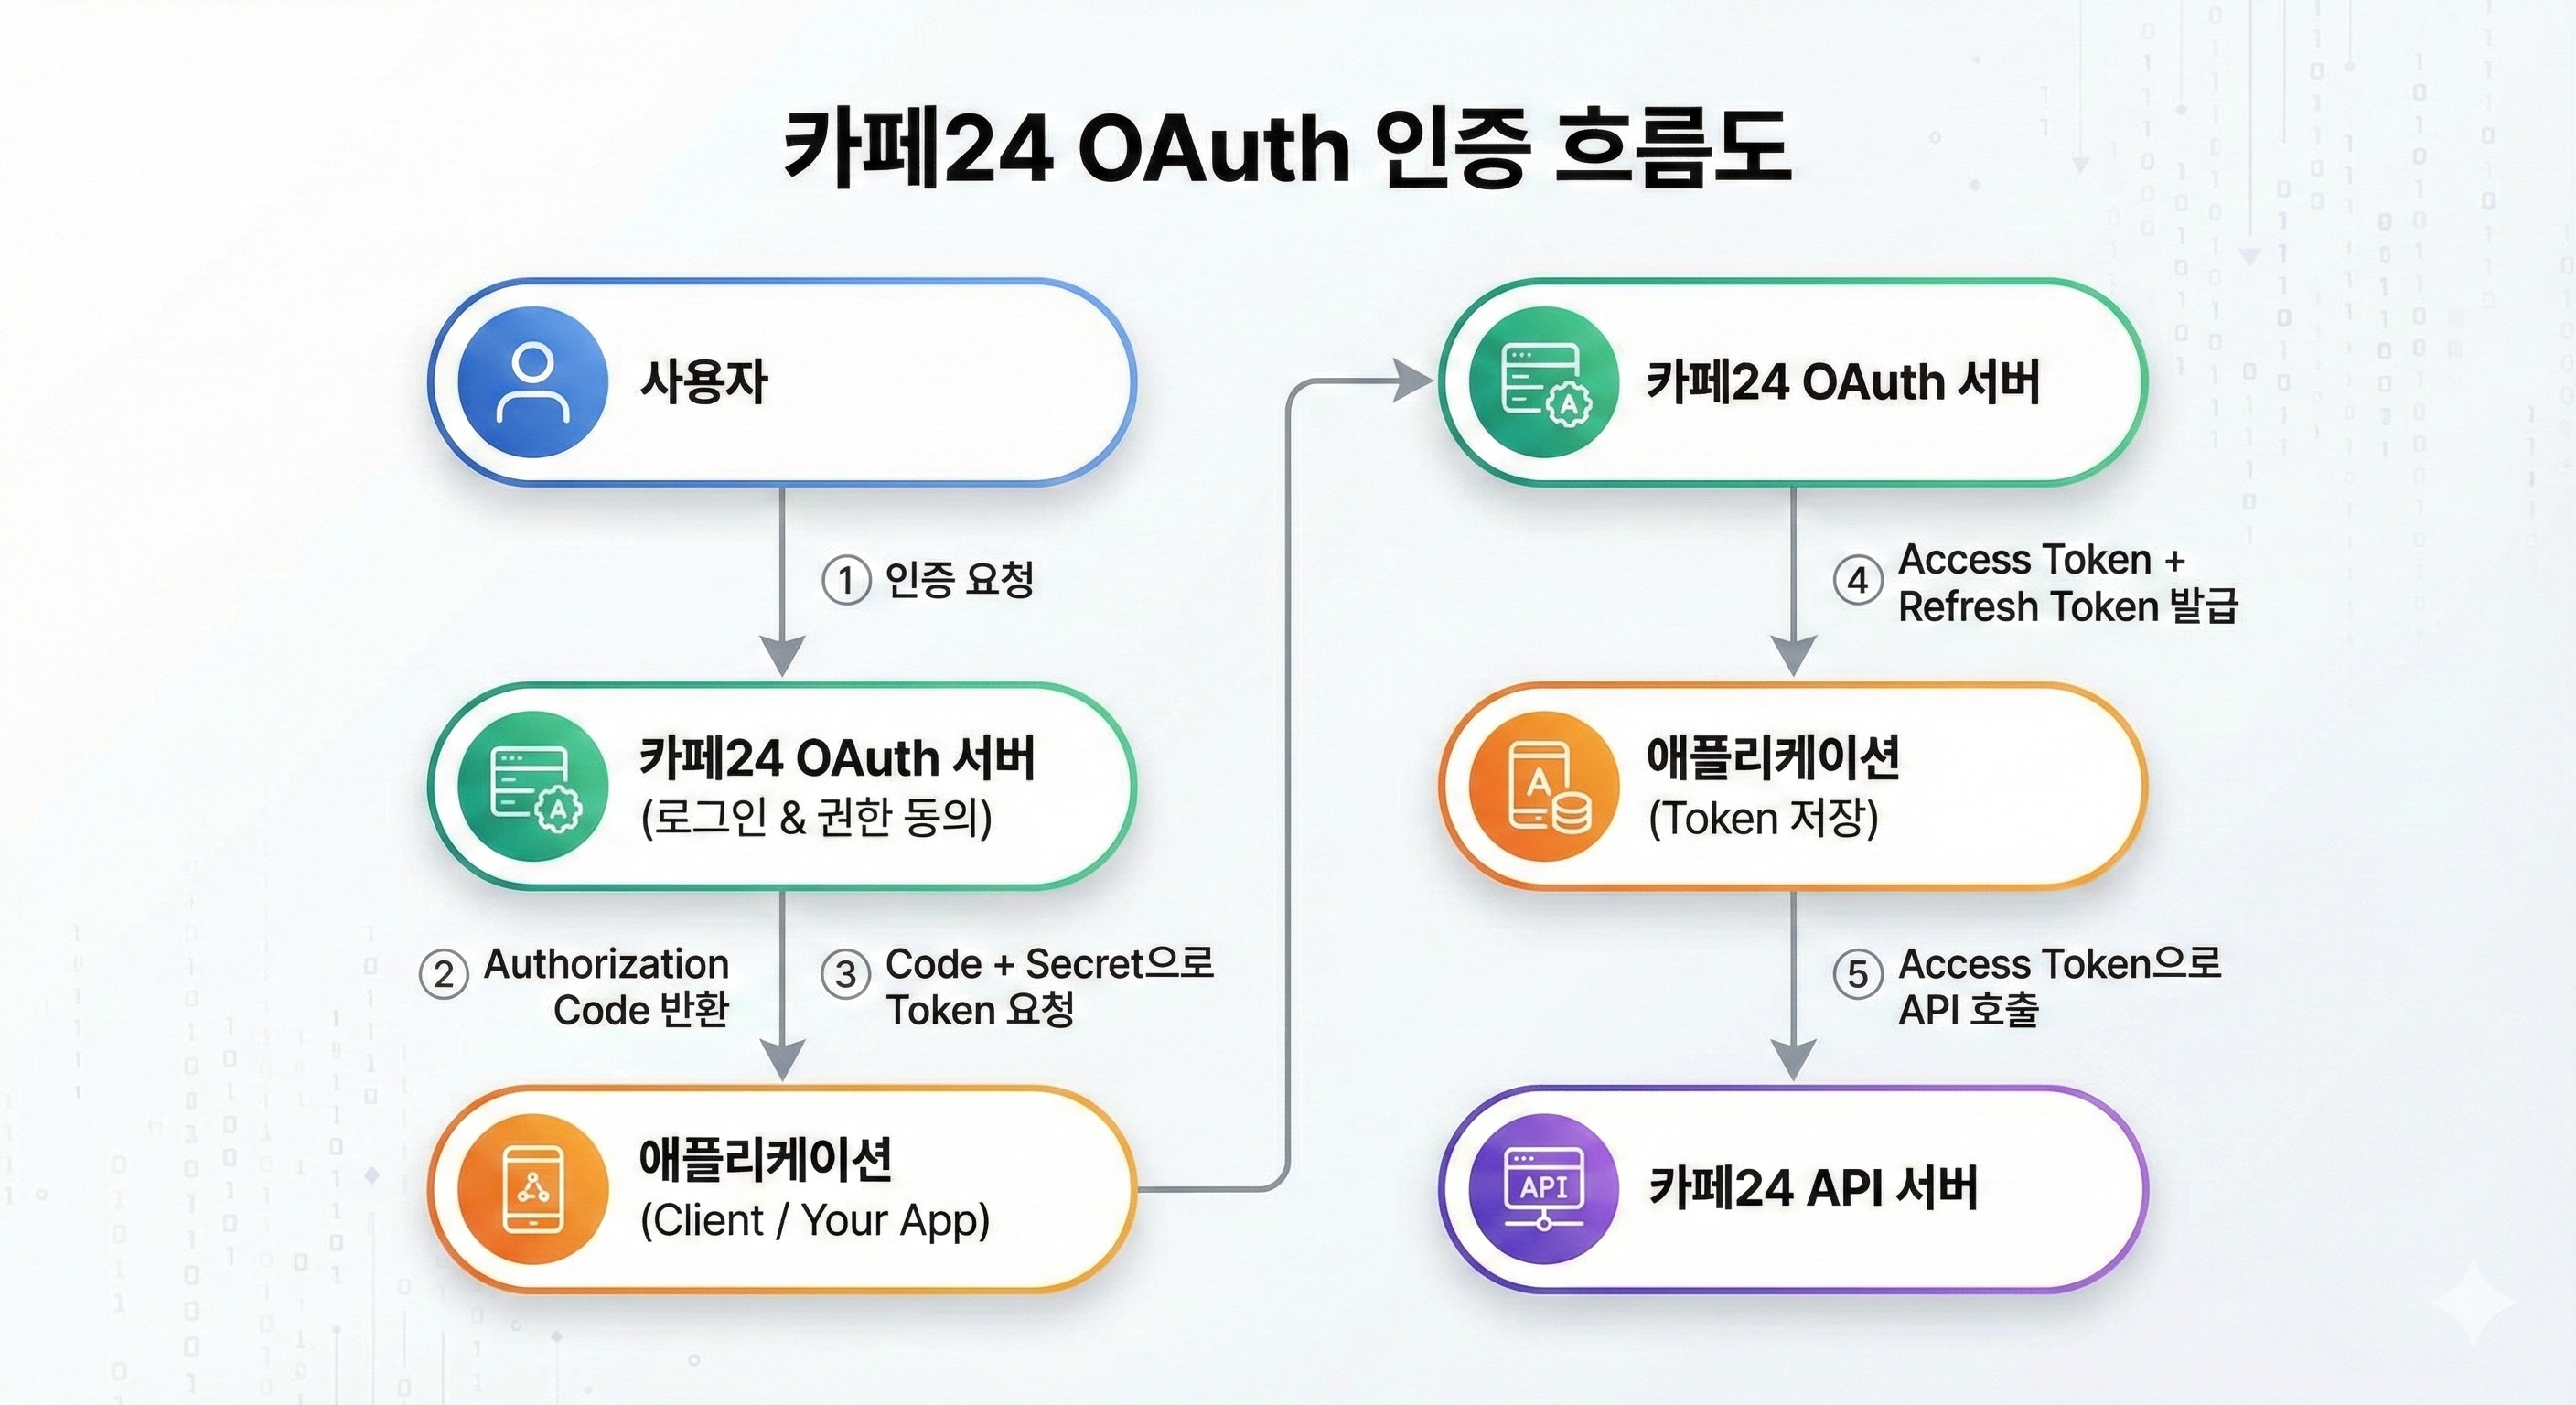
🎯 Step 1: 인증 코드 요청
개요
사용자가 애플리케이션을 승인하면 Authorization Code를 받습니다. 이 코드는 Access Token을 발급받기 위해 필요합니다.
⚠️ 중요: 코드 요청은 웹 브라우저에서만 진행하세요. cURL이나 프로그래밍 언어로 직접 요청하면 안 됩니다.
필수 파라미터
| 파라미터 | 설명 | 예시 |
|---|---|---|
mall_id | 쇼핑몰 ID | yourmall |
response_type | 응답 타입 (고정) | code |
client_id | 앱의 Client ID | BrIfqEKoPxeE..... |
redirect_uri | 인증 후 리다이렉트 URL | https://yourapp.com/callback |
scope | 요청할 권한 범위 (공백으로 구분) | mall.read_product mall.read_order |
state | CSRF 방지 토큰 (필수) | random_string_12345 |
요청 URL
https://{mall_id}.cafe24api.com/api/v2/oauth/authorize?response_type=code&client_id={client_id}&state={state}&redirect_uri={redirect_uri}&scope={scope}
실제 사용 예
# 웹 브라우저 주소창에 입력하거나 링크로 제공
https://yourmall.cafe24api.com/api/v2/oauth/authorize?response_type=code&client_id=BrIfqEKoPxeE&state=xyz789&redirect_uri=https%3A%2F%2Fyourapp.com%2Fcallback&scope=mall.read_product+mall.read_order+mall.read_store
성공 응답
사용자가 권한을 승인하면 카페24 서버가 설정된 redirect_uri로 리다이렉트합니다:
HTTP/1.1 302 Found
Location: https://yourapp.com/callback?code={authorization_code}&state=xyz789
응답 파라미터
| 파라미터 | 설명 |
|---|---|
code | Authorization Code (1분 유효, 1회 사용) |
state | 요청 시 보낸 state 값 (위변조 방지 확인용) |
구현 예제
Node.js/Express
const express = require('express');
const crypto = require('crypto');
const app = express();

const CLIENT_ID = process.env.CAFE24_CLIENT_ID;
const CLIENT_SECRET = process.env.CAFE24_CLIENT_SECRET;
const MALL_ID = process.env.CAFE24_MALL_ID;
const REDIRECT_URI = process.env.CAFE24_REDIRECT_URI;

// 로그인 버튼 클릭 시
app.get('/login', (req, res) => {
  // State 값 생성 (CSRF 방지)
  const state = crypto.randomBytes(16).toString('hex');

  // 세션에 저장
  req.session.oauthState = state;

  // Scope 정의
  const scopes = ['mall.read_product', 'mall.read_order', 'mall.read_store'].join(' ');

  // 카페24 OAuth URL 생성
  const authUrl = new URL(`https://${MALL_ID}.cafe24api.com/api/v2/oauth/authorize`);
  authUrl.searchParams.append('response_type', 'code');
  authUrl.searchParams.append('client_id', CLIENT_ID);
  authUrl.searchParams.append('state', state);
  authUrl.searchParams.append('redirect_uri', REDIRECT_URI);
  authUrl.searchParams.append('scope', scopes);

  // 사용자를 OAuth 페이지로 리다이렉트
  res.redirect(authUrl.toString());
});
Python/Flask
from flask import Flask, session, redirect, url_for, request
from urllib.parse import urlencode
import secrets

app = Flask(__name__)

CLIENT_ID = os.getenv('CAFE24_CLIENT_ID')
CLIENT_SECRET = os.getenv('CAFE24_CLIENT_SECRET')
MALL_ID = os.getenv('CAFE24_MALL_ID')
REDIRECT_URI = os.getenv('CAFE24_REDIRECT_URI')

@app.route('/login')
def login():
    # State 값 생성
    state = secrets.token_urlsafe(32)
    session['oauth_state'] = state
    session.modified = True

    # Scope 정의
    scopes = ['mall.read_product', 'mall.read_order', 'mall.read_store']

    # 파라미터 구성
    params = {
        'response_type': 'code',
        'client_id': CLIENT_ID,
        'state': state,
        'redirect_uri': REDIRECT_URI,
        'scope': ' '.join(scopes)
    }

    # OAuth URL 생성
    auth_url = f"https://{MALL_ID}.cafe24api.com/api/v2/oauth/authorize?{urlencode(params)}"

    return redirect(auth_url)
🎯 Step 2: Access Token 발급
개요
Authorization Code를 사용하여 실제 API 호출에 필요한 Access Token을 받습니다. 이 요청은 백엔드 서버에서 안전하게 진행해야 합니다.
필수 파라미터
| 파라미터 | 설명 | 예시 |
|---|---|---|
grant_type | 요청 타입 (고정) | authorization_code |
code | Step 1에서 받은 Authorization Code | abc123... |
redirect_uri | Step 1에서 사용한 동일한 Redirect URL | https://yourapp.com/callback |
Authorization Header
Authorization: Basic {base64_encode({client_id}:{client_secret})}
요청
curl -X POST \\
  'https://{mall_id}.cafe24api.com/api/v2/oauth/token' \\
  -H 'Authorization: Basic {base64_encode({client_id}:{client_secret})}' \\
  -H 'Content-Type: application/x-www-form-urlencoded' \\
  -d 'grant_type=authorization_code&code={code}&redirect_uri={redirect_uri}'
Base64 인코딩 생성
# macOS/Linux
echo -n "BrIfqEKoPxeE:xYz789" | base64
# 결과: QnJJZnFFSm9QeGVFOnh5Wig0OQ==
성공 응답 (200 OK)
{
  "access_token": "0iqR5nM5EJIq..........",
  "expires_at": "2021-03-01T14:00:00.000",
  "refresh_token": "JeTJ7XpnFC0P..........",
  "refresh_token_expires_at": "2021-03-15T12:00:00.000",
  "client_id": "BrIfqEKoPxeE..........",
  "mall_id": "yourmall",
  "user_id": "test",
  "scopes": [
    "mall.read_order",
    "mall.read_product",
    "mall.read_store"
  ],
  "issued_at": "2021-03-01T12:00:00.000",
  "shop_no": "1",
  "token_type": "Bearer"
}
응답 필드 설명
| 필드 | 설명 | 유효 기간 |
|---|---|---|
access_token | API 호출용 토큰 | 2시간 |
refresh_token | 토큰 갱신용 토큰 | 2주 |
expires_at | Access Token 만료 시간 | - |
refresh_token_expires_at | Refresh Token 만료 시간 | - |
token_type | 토큰 타입 (항상 Bearer) | - |
scopes | 승인된 권한 목록 | - |
issued_at | 토큰 발급 시간 | - |
구현 예제
Node.js/Express
const axios = require('axios');
const Base64 = require('js-base64').Base64;

app.get('/callback', async (req, res) => {
  const { code, state } = req.query;

  // State 검증
  if (state !== req.session.oauthState) {
    return res.status(401).json({ error: 'Invalid state' });
  }

  try {
    // Base64 인코딩
    const auth = Base64.encode(`${CLIENT_ID}:${CLIENT_SECRET}`);

    // Token 요청
    const response = await axios.post(
      `https://${MALL_ID}.cafe24api.com/api/v2/oauth/token`,
      `grant_type=authorization_code&code=${code}&redirect_uri=${REDIRECT_URI}`,
      {
        headers: {
          'Authorization': `Basic ${auth}`,
          'Content-Type': 'application/x-www-form-urlencoded'
        }
      }
    );

    const tokenData = response.data;

    // 토큰을 DB에 저장하거나 세션에 저장
    req.session.tokens = {
      access_token: tokenData.access_token,
      refresh_token: tokenData.refresh_token,
      expires_at: new Date(tokenData.expires_at),
      refresh_token_expires_at: new Date(tokenData.refresh_token_expires_at)
    };

    // 사용자 정보 저장
    req.session.user = {
      mall_id: tokenData.mall_id,
      user_id: tokenData.user_id,
      shop_no: tokenData.shop_no,
      scopes: tokenData.scopes
    };

    res.redirect('/dashboard');
  } catch (error) {
    console.error('Token exchange error:', error.response?.data);
    res.status(400).json({ error: 'Failed to get access token' });
  }
});
Python/Flask
import requests
import base64
from datetime import datetime

@app.route('/callback')
def callback():
    code = request.args.get('code')
    state = request.args.get('state')

    # State 검증
    if state != session.get('oauth_state'):
        return jsonify({'error': 'Invalid state'}), 401

    try:
        # Base64 인코딩
        auth_string = f"{CLIENT_ID}:{CLIENT_SECRET}"
        auth_bytes = auth_string.encode('utf-8')
        auth_b64 = base64.b64encode(auth_bytes).decode('utf-8')

        # Token 요청
        response = requests.post(
            f"https://{MALL_ID}.cafe24api.com/api/v2/oauth/token",
            data={
                'grant_type': 'authorization_code',
                'code': code,
                'redirect_uri': REDIRECT_URI
            },
            headers={
                'Authorization': f'Basic {auth_b64}',
                'Content-Type': 'application/x-www-form-urlencoded'
            }
        )

        token_data = response.json()

        # 토큰 저장
        session['tokens'] = {
            'access_token': token_data['access_token'],
            'refresh_token': token_data['refresh_token'],
            'expires_at': token_data['expires_at'],
            'refresh_token_expires_at': token_data['refresh_token_expires_at']
        }

        session['user'] = {
            'mall_id': token_data['mall_id'],
            'user_id': token_data['user_id'],
            'shop_no': token_data['shop_no'],
            'scopes': token_data['scopes']
        }

        session.modified = True

        return redirect('/dashboard')
    except Exception as e:
        print(f"Token exchange error: {e}")
        return jsonify({'error': 'Failed to get access token'}), 400
🎯 Step 3: API 호출
개요
발급받은 Access Token을 사용하여 카페24 API를 호출합니다.
Authorization 헤더
모든 API 요청에 Access Token을 Bearer 토큰 형식으로 포함하세요:
Authorization: Bearer {access_token}
요청 예제
상품 조회
curl -X GET \\
  'https://yourmall.cafe24api.com/api/v2/admin/products' \\
  -H 'Authorization: Bearer 0iqR5nM5EJIq..........' \\
  -H 'Content-Type: application/json'
주문 생성
curl -X POST \\
  'https://yourmall.cafe24api.com/api/v2/admin/orders' \\
  -H 'Authorization: Bearer 0iqR5nM5EJIq..........' \\
  -H 'Content-Type: application/json' \\
  -d '{
    "customer_name": "John Doe",
    "customer_email": "john@example.com",
    "items": [
      {
        "product_no": 128,
        "quantity": 2
      }
    ]
  }'
구현 예제
Node.js/Express
async function makeApiRequest(endpoint, method = 'GET', data = null) {
  const { access_token } = req.session.tokens;

  const config = {
    method,
    url: `https://${MALL_ID}.cafe24api.com/api/v2/admin${endpoint}`,
    headers: {
      'Authorization': `Bearer ${access_token}`,
      'Content-Type': 'application/json'
    }
  };

  if (data) {
    config.data = data;
  }

  try {
    const response = await axios(config);
    return response.data;
  } catch (error) {
    if (error.response?.status === 401) {
      // Token 만료, 갱신 필요
      throw new Error('Token expired');
    }
    throw error;
  }
}

// 사용 예
app.get('/api/products', async (req, res) => {
  try {
    const products = await makeApiRequest('/products');
    res.json(products);
  } catch (error) {
    res.status(500).json({ error: error.message });
  }
});
🔄 토큰 갱신
개요
Access Token은 2시간 후 만료됩니다. Refresh Token을 사용하면 새로운 Access Token을 발급받을 수 있습니다.
중요 사항
- Refresh Token 유효 기간: 2주
- 자동 갱신: Refresh Token 만료 전에 요청하면 새로운 Refresh Token도 함께 반환됨
- 이전 토큰 폐기: 새 토큰 발급 시 이전 Refresh Token은 자동으로 폐기됨
요청
curl -X POST \\
  'https://{mall_id}.cafe24api.com/api/v2/oauth/token' \\
  -H 'Authorization: Basic {base64_encode({client_id}:{client_secret})}' \\
  -H 'Content-Type: application/x-www-form-urlencoded' \\
  -d 'grant_type=refresh_token&refresh_token={refresh_token}'
성공 응답 (200 OK)
{
  "access_token": "21EZes0dGSfN..........",
  "expires_at": "2021-03-01T15:50:00.000",
  "refresh_token": "xLlhWztQHBik............",
  "refresh_token_expires_at": "2021-03-15T13:50:00.000",
  "client_id": "BrIfqEKoPxeE..........",
  "mall_id": "yourmall",
  "user_id": "test",
  "scopes": ["mall.read_order", "mall.read_product", "mall.read_store"],
  "issued_at": "2021-03-01T13:50:00.000",
  "shop_no": "1",
  "token_type": "Bearer"
}
구현 예제 - 자동 갱신 로직
Node.js/Express - Middleware
const Base64 = require('js-base64').Base64;

// Token 갱신 함수
async function refreshAccessToken(refreshToken) {
  try {
    const auth = Base64.encode(`${CLIENT_ID}:${CLIENT_SECRET}`);

    const response = await axios.post(
      `https://${MALL_ID}.cafe24api.com/api/v2/oauth/token`,
      `grant_type=refresh_token&refresh_token=${refreshToken}`,
      {
        headers: {
          'Authorization': `Basic ${auth}`,
          'Content-Type': 'application/x-www-form-urlencoded'
        }
      }
    );

    return response.data;
  } catch (error) {
    console.error('Token refresh error:', error.response?.data);
    throw error;
  }
}

// Middleware - Token 자동 갱신
app.use(async (req, res, next) => {
  // 토큰이 없으면 넘어감
  if (!req.session.tokens) {
    return next();
  }

  const { access_token, refresh_token, expires_at } = req.session.tokens;
  const now = new Date();
  const expiresDate = new Date(expires_at);

  // Token 만료 5분 전에 갱신
  const refreshThreshold = new Date(expiresDate.getTime() - 5 * 60 * 1000);

  if (now > refreshThreshold) {
    try {
      const newTokens = await refreshAccessToken(refresh_token);
      req.session.tokens = {
        access_token: newTokens.access_token,
        refresh_token: newTokens.refresh_token,
        expires_at: new Date(newTokens.expires_at),
        refresh_token_expires_at: new Date(newTokens.refresh_token_expires_at)
      };
      console.log('Token refreshed successfully');
    } catch (error) {
      console.error('Token refresh failed, logging out user');
      req.session.destroy();
      return res.redirect('/login');
    }
  }

  next();
});
Python/Flask
def refresh_access_token(refresh_token):
    """Refresh Token으로 새로운 Access Token 발급"""
    try:
        auth_string = f"{CLIENT_ID}:{CLIENT_SECRET}"
        auth_bytes = auth_string.encode('utf-8')
        auth_b64 = base64.b64encode(auth_bytes).decode('utf-8')

        response = requests.post(
            f"https://{MALL_ID}.cafe24api.com/api/v2/oauth/token",
            data={
                'grant_type': 'refresh_token',
                'refresh_token': refresh_token
            },
            headers={
                'Authorization': f'Basic {auth_b64}',
                'Content-Type': 'application/x-www-form-urlencoded'
            }
        )

        return response.json()
    except Exception as e:
        print(f"Token refresh error: {e}")
        raise

# Flask before_request - Token 자동 갱신
@app.before_request
def check_and_refresh_token():
    if 'tokens' not in session:
        return

    try:
        expires_at = datetime.fromisoformat(session['tokens']['expires_at'].replace('Z', '+00:00'))
        refresh_threshold = expires_at - timedelta(minutes=5)

        if datetime.now(timezone.utc) > refresh_threshold or datetime.now() > expires_at.replace(tzinfo=None):
            new_tokens = refresh_access_token(session['tokens']['refresh_token'])
            session['tokens'] = {
                'access_token': new_tokens['access_token'],
                'refresh_token': new_tokens['refresh_token'],
                'expires_at': new_tokens['expires_at'],
                'refresh_token_expires_at': new_tokens['refresh_token_expires_at']
            }
            session.modified = True
            print('Token refreshed successfully')
    except Exception as e:
        print(f'Token refresh failed: {e}')
        session.clear()
        return redirect('/login')
🛑 토큰 폐기
개요
사용자가 로그아웃하거나 더 이상 API 접근이 필요 없을 때 토큰을 명시적으로 폐기할 수 있습니다.
중요 사항
- Access Token을 폐기하면 해당 Refresh Token도 함께 폐기됨
- 폐기된 토큰으로 API 호출 시 401 Unauthorized 에러 발생
요청
curl -X POST \\
  'https://{mall_id}.cafe24api.com/api/v2/oauth/revoke' \\
  -H 'Authorization: Basic {base64_encode({client_id}:{client_secret})}' \\
  -H 'Content-Type: application/x-www-form-urlencoded' \\
  -d 'token={token}&token_hint={token_hint}'
파라미터
| 파라미터 | 설명 | 예시 |
|---|---|---|
token | 폐기할 토큰 (Access 또는 Refresh) | 0iqR5nM5EJIq.. |
token_hint | 토큰 타입 | access_token 또는 refresh_token |
구현 예제
Node.js/Express
async function revokeToken(token, tokenHint = 'access_token') {
  try {
    const auth = Base64.encode(`${CLIENT_ID}:${CLIENT_SECRET}`);

    await axios.post(
      `https://${MALL_ID}.cafe24api.com/api/v2/oauth/revoke`,
      `token=${token}&token_hint=${tokenHint}`,
      {
        headers: {
          'Authorization': `Basic ${auth}`,
          'Content-Type': 'application/x-www-form-urlencoded'
        }
      }
    );

    console.log(`${tokenHint} revoked successfully`);
  } catch (error) {
    console.error('Token revoke error:', error.response?.data);
    throw error;
  }
}

// 로그아웃 엔드포인트
app.get('/logout', async (req, res) => {
  try {
    if (req.session.tokens) {
      // Access Token 폐기
      await revokeToken(req.session.tokens.access_token, 'access_token');
    }

    req.session.destroy();
    res.redirect('/login');
  } catch (error) {
    console.error('Logout error:', error);
    // 토큰 폐기 실패해도 세션 제거
    req.session.destroy();
    res.redirect('/login');
  }
});
📡 API별 인증 방식
Admin API (OAuth 2.0)
인증 방식: Bearer Token
curl -X GET \\
  'https://yourmall.cafe24api.com/api/v2/admin/products' \\
  -H 'Authorization: Bearer {access_token}' \\
  -H 'Content-Type: application/json'
사용 시 조건:
- OAuth 2.0 인증 필수
- Access Token 필요
Front API (Client ID 기반)
인증 방식: Client ID 헤더
curl -X GET \\
  'https://yourmall.cafe24api.com/api/v2/products' \\
  -H 'X-Cafe24-Client-Id: {client_id}' \\
  -H 'Content-Type: application/json'
사용 시 조건:
- OAuth 2.0 인증 불필요
- Client ID만 필요
Cafe24 Analytics API (OAuth 2.0)
인증 방식: Bearer Token
curl -X GET \\
  'https://ca-api.cafe24data.com/visitors/pageview' \\
  -H 'Authorization: Bearer {access_token}' \\
  -H 'Content-Type: application/json'
🛡️ Security Best Practices
1. Client Secret 보호
// ✅ 환경 변수 사용
const CLIENT_SECRET = process.env.CAFE24_CLIENT_SECRET;

// .env 파일
CAFE24_CLIENT_ID=BrIfqEKoPxeE
CAFE24_CLIENT_SECRET=xYz789

// .gitignore에 추가
echo ".env" >> .gitignore
2. HTTPS 필수
// ✅ 항상 HTTPS 사용
const redirectUri = 'https://yourapp.com/callback';
3. State 값으로 CSRF 방지
const crypto = require('crypto');
const state = crypto.randomBytes(32).toString('hex');
session.oauthState = state;

// Callback에서 검증
if (req.query.state !== session.oauthState) {
  throw new Error('CSRF attack detected');
}
4. Token 저장 방법
서버 세션 (권장)
// 토큰을 서버 세션에만 저장
req.session.tokens = {
  access_token: token.access_token,
  refresh_token: token.refresh_token,
  expires_at: token.expires_at
};
데이터베이스 저장 (암호화)
CREATE TABLE user_tokens (
  id INT PRIMARY KEY,
  user_id VARCHAR(255),
  access_token VARCHAR(255) ENCRYPTED,
  refresh_token VARCHAR(255) ENCRYPTED,
  expires_at DATETIME,
  created_at TIMESTAMP DEFAULT CURRENT_TIMESTAMP
);
5. Token 만료 처리
// 토큰 만료 시간 확인
const isTokenExpired = (expiresAt) => {
  return new Date() > new Date(expiresAt);
};
6. 권한 검증 (Scope 확인)
const requiredScopes = ['mall.read_product', 'mall.write_order'];
const grantedScopes = tokens.scopes;

const hasAllScopes = requiredScopes.every(scope =>
  grantedScopes.includes(scope)
);

if (!hasAllScopes) {
  throw new Error('Insufficient permissions');
}
🐛 에러 처리 및 트러블슈팅
401 Unauthorized
증상: "error": "invalid_grant" 또는 "error": "invalid_token"
원인:
- Authorization Code 만료 (1분 이내 사용 필수)
- Authorization Code 재사용 시도
- 잘못된 Client ID/Secret
- Token 만료
해결책:
// 토큰 갱신 시도
if (error.response?.status === 401) {
  try {
    const newTokens = await refreshAccessToken(refresh_token);
    // 새 토큰으로 재시도
  } catch (refreshError) {
    // 갱신 실패, 재로그인 필요
    res.redirect('/login');
  }
}
400 Bad Request
증상: "error": "invalid_request"
원인:
- 필수 파라미터 누락
- 잘못된 redirect_uri
- Content-Type 오류
해결책:
// 모든 필수 파라미터 확인
const requiredParams = ['grant_type', 'code', 'redirect_uri'];
const hasAllParams = requiredParams.every(param => data[param]);

if (!hasAllParams) {
  throw new Error('Missing required parameters');
}
403 Forbidden
증상: Scope 권한 부족
원인:
- 요청한 Scope가 승인되지 않음
- 사용자가 권한 동의 시 특정 권한 거부
해결책:
// 요청한 Scope 확인
const requiredScopes = ['mall.read_product', 'mall.write_order'];
const missingScopes = requiredScopes.filter(
  scope => !tokens.scopes.includes(scope)
);

if (missingScopes.length > 0) {
  console.log(`Missing scopes: ${missingScopes.join(', ')}`);
  // 재인증 필요
  res.redirect('/login');
}
✅ 프로덕션 체크리스트
개발 단계
- 로컬 개발 환경에서 OAuth 흐름 테스트 완료
- Redirect URI를 localhost에서 테스트
- State 값 검증 구현
- Token 저장 메커니즘 구현
- 에러 처리 로직 구현
보안 검토
- Client Secret이 환경 변수에만 저장됨
- .env 파일이 .gitignore에 포함됨
- HTTPS 적용됨
- Token이 서버 세션에만 저장됨
- CSRF 토큰(State) 검증 구현됨
- Token 만료 처리 구현됨
API 테스트
- Authorization Code 발급 테스트
- Access Token 발급 테스트
- API 호출 테스트 (모든 Scope)
- Token 갱신 테스트
- Token 폐기 테스트
- Scope 권한 검증 테스트
배포 전
- Redirect URI를 프로덕션 URL로 변경
- 개발자센터에서 Redirect URI 등록 확인
- 환경 변수 설정 확인
- HTTPS 인증서 확인
- Error logging 설정
- Token 갱신 로직 테스트
모니터링
- Token 만료 이슈 모니터링
- API 호출 실패 로깅
- Unauthorized 에러 추적
- Token 갱신 성공/실패율 모니터링
📚 추가 리소스
🤝 지원
문제가 발생하면: