OAuth 2.0認証ガイド
CAFE24 APIはOAuth 2.0ベースのセキュアな認証システムを提供します。 このガイドでは、ステップごとの認証方法とトークン管理を詳しく解説します。
📚 目次
- OAuth 2.0の概要
- 認証フロー
- Step 1: 認可コードのリクエスト
- Step 2: アクセストークンの発行
- Step 3: API呼び出し
- トークン再発行(Refresh)
- トークンの失効(Revoke)
- API別の認証方式
- セキュリティのベストプラクティス
- エラーハンドリングとトラブルシューティング
- 本番環境チェックリスト
🔑 OAuth 2.0の概要
OAuth 2.0は、ユーザーの認証情報を直接共有することなく、サードパーティアプリケーションが安全にAPIへアクセスできるようにするオープン標準です。
主な特徴
- セキュリティ: ユーザーのパスワードを露出しない
- 権限制御: Scopeで細かな権限管理が可能
- トークンベース: 一時的なAccess Tokenを利用
- 再発行可能: Refresh Tokenで自動更新
主要用語
| 用語 | 説明 |
|---|---|
| Resource Owner | ショッピングモール管理者(エンドユーザー) |
| Client | CAFE24アプリストアに登録されたアプリケーション |
| Authorization Server | CAFE24のOAuthサーバー |
| Resource Server | CAFE24のAPIサーバー |
| Access Token | APIアクセス権限を表す一時トークン |
| Refresh Token | Access Tokenを再発行するためのトークン |
| Scope | トークンが保有する権限の範囲 |
| Authorization Code | 一時的な認可コード(有効期間1分) |
🔄 認証フロー
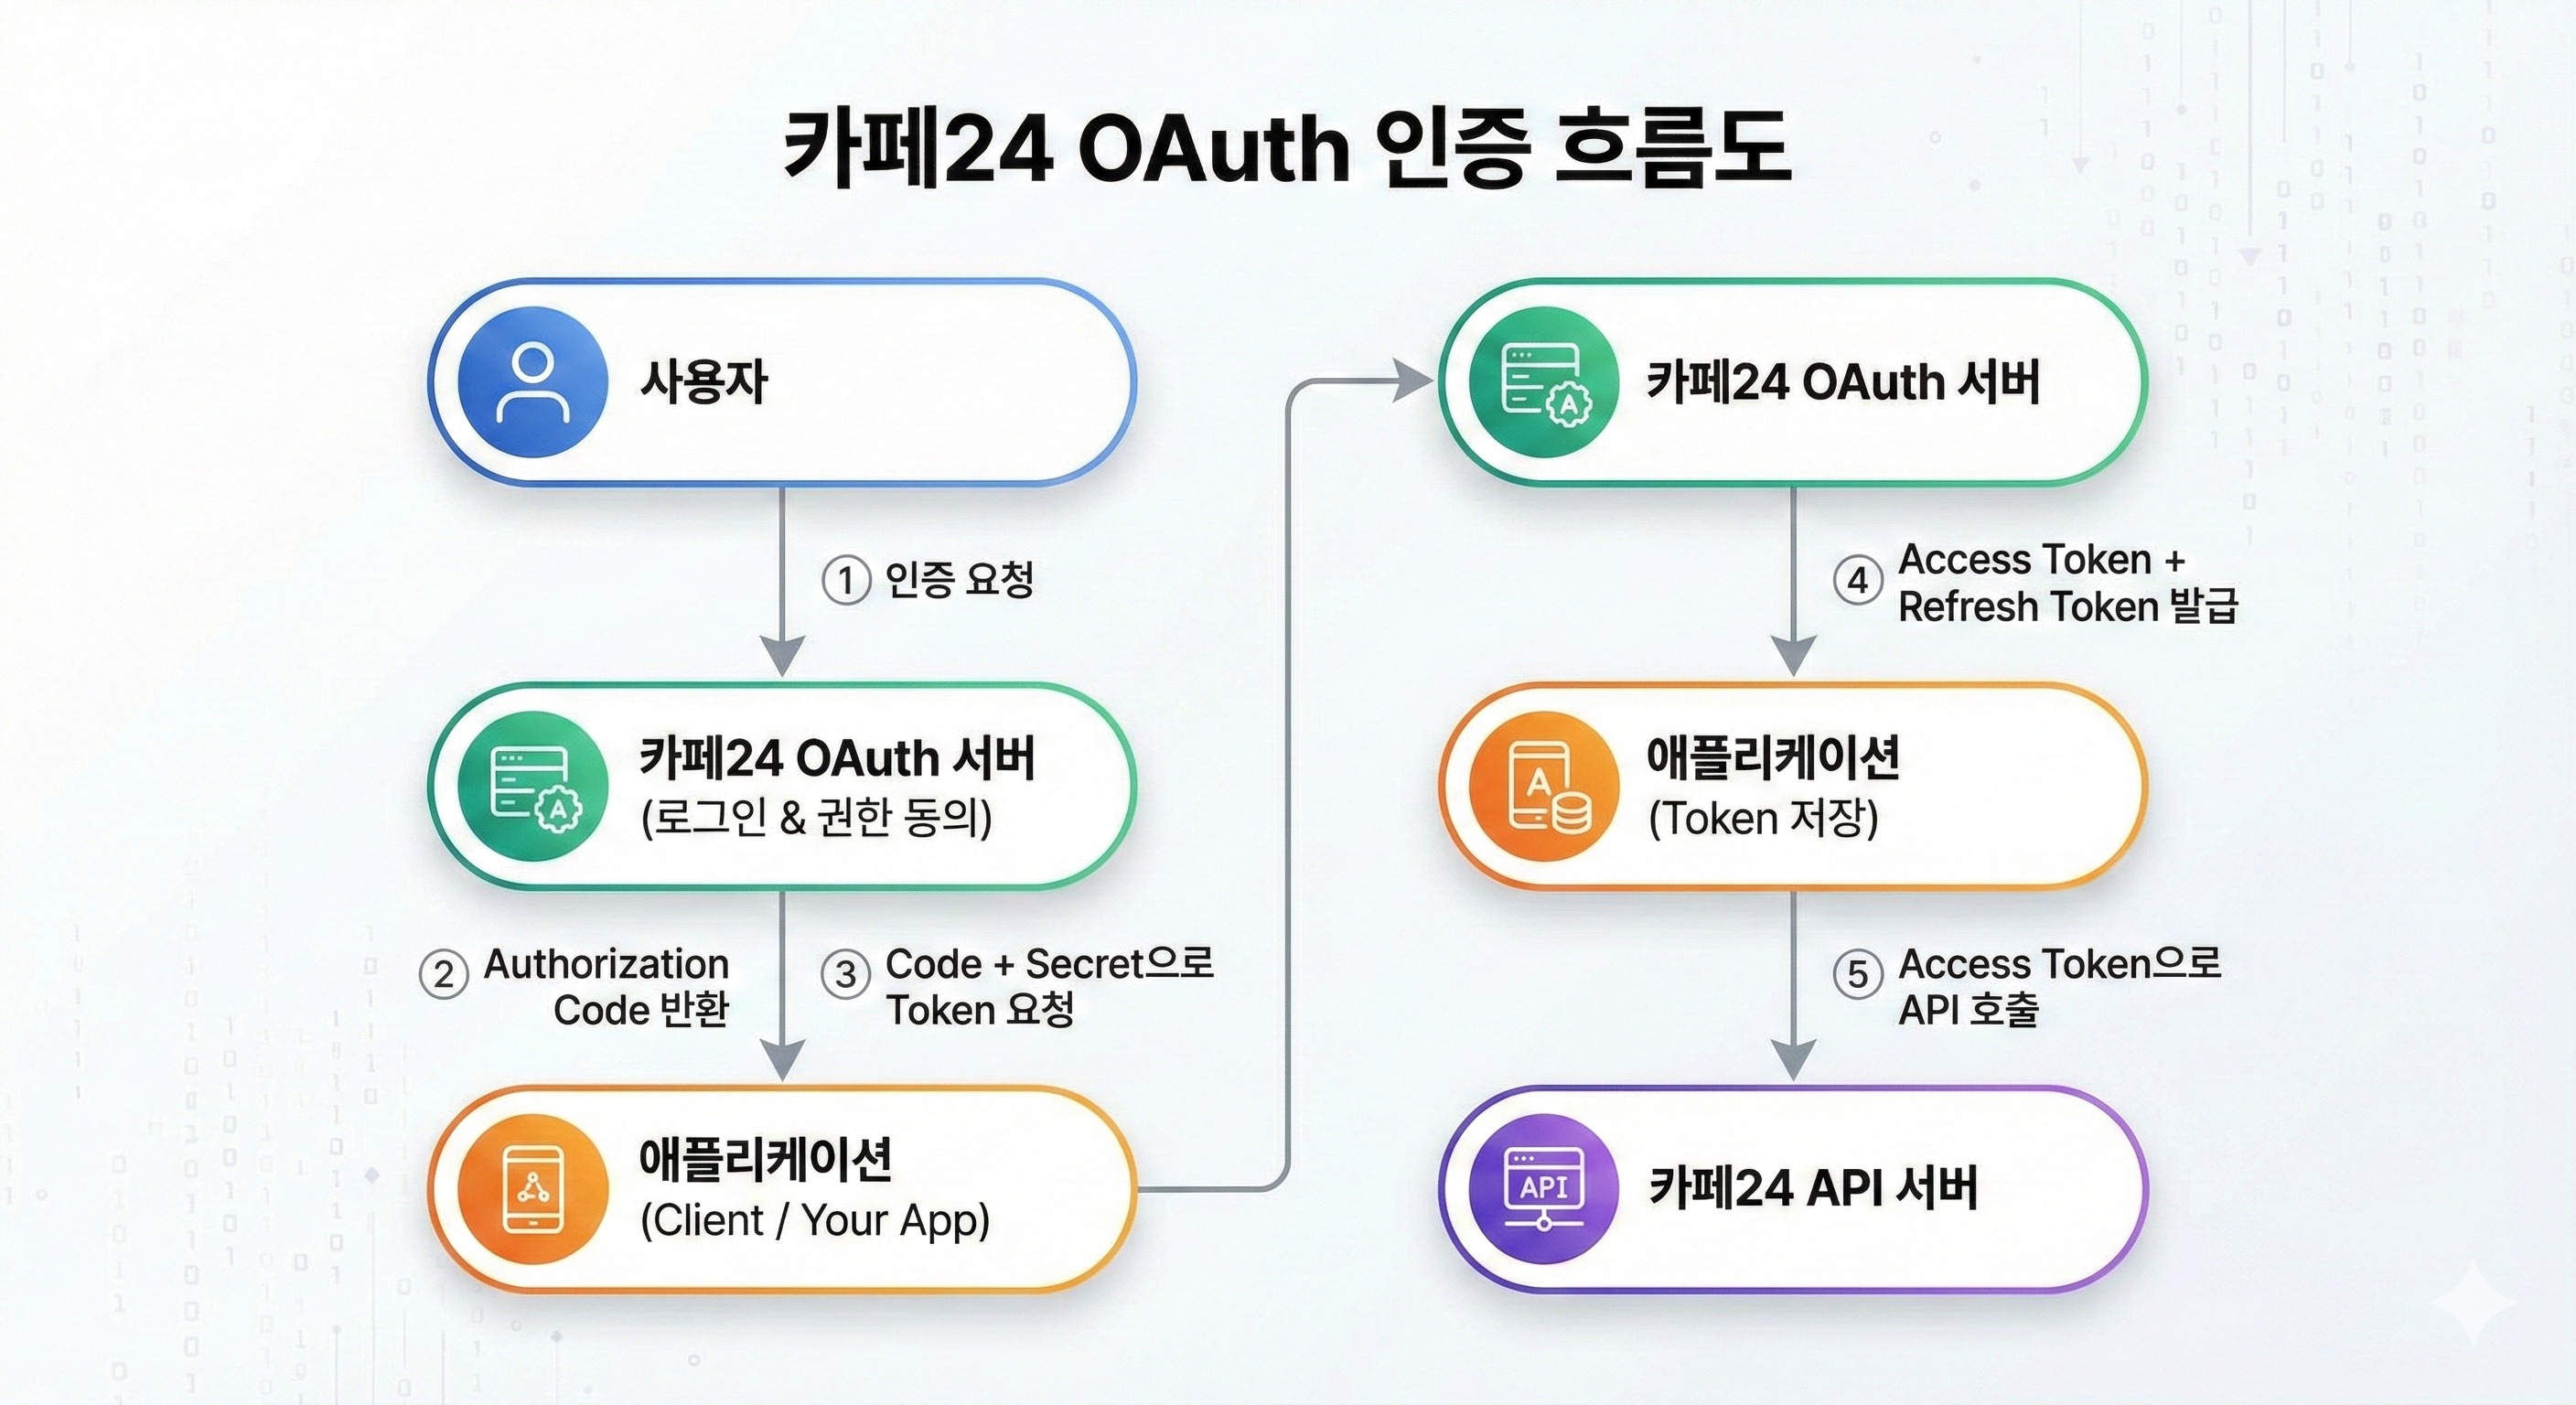
🎯 Step 1: 認可コードのリクエスト
概要
ユーザーがアプリケーションを承認すると、Authorization Code(認可コード)が発行されます。 このコードはAccess Tokenを発行するために必要です。
⚠️ 重要: コードのリクエストは必ず Webブラウザ上 で行ってください。cURLやプログラミング言語から直接リクエストしないでください。
必須パラメータ
| パラメータ | 説明 | 例 |
|---|---|---|
mall_id | ショッピングモールID | yourmall |
response_type | レスポンスタイプ(固定値) | code |
client_id | アプリのClient ID | BrIfqEKoPxeE..... |
redirect_uri | 認証後のリダイレクトURL | https://yourapp.com/callback |
scope | リクエストする権限範囲(スペース区切り) | mall.read_product mall.read_order |
state | CSRF防止用トークン(必須) | random_string_12345 |
リクエストURL
https://{mall_id}.cafe24api.com/api/v2/oauth/authorize?response_type=code&client_id={client_id}&state={state}&redirect_uri={redirect_uri}&scope={scope}
実際の使用例
# Webブラウザのアドレスバーに入力するか、リンクとして提供
https://yourmall.cafe24api.com/api/v2/oauth/authorize?response_type=code&client_id=BrIfqEKoPxeE&state=xyz789&redirect_uri=https%3A%2F%2Fyourapp.com%2Fcallback&scope=mall.read_product+mall.read_order+mall.read_store
成功レスポンス
ユーザーが権限を承認すると、CAFE24サーバーは設定された redirect_uri にリダイレクトします。
HTTP/1.1 302 Found
Location: https://yourapp.com/callback?code={authorization_code}&state=xyz789
レスポンスパラメータ
| パラメータ | 説明 |
|---|---|
code | Authorization Code(有効期間1分、1回のみ使用可) |
state | リクエスト時に送信したstate値(CSRF検証用) |
実装例
Node.js/Express
const express = require('express');
const crypto = require('crypto');
const app = express();

const CLIENT_ID = process.env.CAFE24_CLIENT_ID;
const CLIENT_SECRET = process.env.CAFE24_CLIENT_SECRET;
const MALL_ID = process.env.CAFE24_MALL_ID;
const REDIRECT_URI = process.env.CAFE24_REDIRECT_URI;

// ログインボタンがクリックされた時
app.get('/login', (req, res) => {
  // State値の生成(CSRF防止)
  const state = crypto.randomBytes(16).toString('hex');

  // セッションに保存
  req.session.oauthState = state;

  // Scopeを定義
  const scopes = ['mall.read_product', 'mall.read_order', 'mall.read_store'].join(' ');

  // CAFE24 OAuth URLを生成
  const authUrl = new URL(`https://${MALL_ID}.cafe24api.com/api/v2/oauth/authorize`);
  authUrl.searchParams.append('response_type', 'code');
  authUrl.searchParams.append('client_id', CLIENT_ID);
  authUrl.searchParams.append('state', state);
  authUrl.searchParams.append('redirect_uri', REDIRECT_URI);
  authUrl.searchParams.append('scope', scopes);

  // ユーザーをOAuthページへリダイレクト
  res.redirect(authUrl.toString());
});
Python/Flask
from flask import Flask, session, redirect, url_for, request
from urllib.parse import urlencode
import secrets

app = Flask(__name__)

CLIENT_ID = os.getenv('CAFE24_CLIENT_ID')
CLIENT_SECRET = os.getenv('CAFE24_CLIENT_SECRET')
MALL_ID = os.getenv('CAFE24_MALL_ID')
REDIRECT_URI = os.getenv('CAFE24_REDIRECT_URI')

@app.route('/login')
def login():
    # State値の生成
    state = secrets.token_urlsafe(32)
    session['oauth_state'] = state
    session.modified = True

    # Scopeを定義
    scopes = ['mall.read_product', 'mall.read_order', 'mall.read_store']

    # パラメータを構築
    params = {
        'response_type': 'code',
        'client_id': CLIENT_ID,
        'state': state,
        'redirect_uri': REDIRECT_URI,
        'scope': ' '.join(scopes)
    }

    # OAuth URLを生成
    auth_url = f"https://{MALL_ID}.cafe24api.com/api/v2/oauth/authorize?{urlencode(params)}"

    return redirect(auth_url)
🎯 Step 2: アクセストークンの発行
概要
Authorization Codeを使い、実際のAPI呼び出しに必要なAccess Tokenを取得します。 このリクエストは必ず バックエンドサーバー から安全に行ってください。
必須パラメータ
| パラメータ | 説明 | 例 |
|---|---|---|
grant_type | リクエスト種別(固定値) | authorization_code |
code | Step 1で受け取ったAuthorization Code | abc123... |
redirect_uri | Step 1で使用したリダイレクトURLと同一 | https://yourapp.com/callback |
Authorizationヘッダー
Authorization: Basic {base64_encode({client_id}:{client_secret})}
リクエスト
curl -X POST \\
  'https://{mall_id}.cafe24api.com/api/v2/oauth/token' \\
  -H 'Authorization: Basic {base64_encode({client_id}:{client_secret})}' \\
  -H 'Content-Type: application/x-www-form-urlencoded' \\
  -d 'grant_type=authorization_code&code={code}&redirect_uri={redirect_uri}'
Base64エンコーディング生成
# macOS/Linux
echo -n "BrIfqEKoPxeE:xYz789" | base64
# 結果: QnJJZnFFSm9QeGVFOnh5Wig0OQ==
成功レスポンス(200 OK)
{
  "access_token": "0iqR5nM5EJIq..........",
  "expires_at": "2021-03-01T14:00:00.000",
  "refresh_token": "JeTJ7XpnFC0P..........",
  "refresh_token_expires_at": "2021-03-15T12:00:00.000",
  "client_id": "BrIfqEKoPxeE..........",
  "mall_id": "yourmall",
  "user_id": "test",
  "scopes": [
    "mall.read_order",
    "mall.read_product",
    "mall.read_store"
  ],
  "issued_at": "2021-03-01T12:00:00.000",
  "shop_no": "1",
  "token_type": "Bearer"
}
レスポンスフィールドの説明
| フィールド | 説明 | 有効期間 |
|---|---|---|
access_token | API呼び出し用のトークン | 2時間 |
refresh_token | トークン再発行用のトークン | 2週間 |
expires_at | Access Tokenの有効期限 | - |
refresh_token_expires_at | Refresh Tokenの有効期限 | - |
token_type | トークン種別(常にBearer) | - |
scopes | 承認された権限の一覧 | - |
issued_at | トークン発行時刻 | - |
実装例
Node.js/Express
const axios = require('axios');
const Base64 = require('js-base64').Base64;

app.get('/callback', async (req, res) => {
  const { code, state } = req.query;

  // Stateの検証
  if (state !== req.session.oauthState) {
    return res.status(401).json({ error: 'Invalid state' });
  }

  try {
    // Base64エンコード
    const auth = Base64.encode(`${CLIENT_ID}:${CLIENT_SECRET}`);

    // トークンをリクエスト
    const response = await axios.post(
      `https://${MALL_ID}.cafe24api.com/api/v2/oauth/token`,
      `grant_type=authorization_code&code=${code}&redirect_uri=${REDIRECT_URI}`,
      {
        headers: {
          'Authorization': `Basic ${auth}`,
          'Content-Type': 'application/x-www-form-urlencoded'
        }
      }
    );

    const tokenData = response.data;

    // トークンをDBまたはセッションに保存
    req.session.tokens = {
      access_token: tokenData.access_token,
      refresh_token: tokenData.refresh_token,
      expires_at: new Date(tokenData.expires_at),
      refresh_token_expires_at: new Date(tokenData.refresh_token_expires_at)
    };

    // ユーザー情報を保存
    req.session.user = {
      mall_id: tokenData.mall_id,
      user_id: tokenData.user_id,
      shop_no: tokenData.shop_no,
      scopes: tokenData.scopes
    };

    res.redirect('/dashboard');
  } catch (error) {
    console.error('Token exchange error:', error.response?.data);
    res.status(400).json({ error: 'Failed to get access token' });
  }
});
Python/Flask
import requests
import base64
from datetime import datetime

@app.route('/callback')
def callback():
    code = request.args.get('code')
    state = request.args.get('state')

    # Stateの検証
    if state != session.get('oauth_state'):
        return jsonify({'error': 'Invalid state'}), 401

    try:
        # Base64エンコード
        auth_string = f"{CLIENT_ID}:{CLIENT_SECRET}"
        auth_bytes = auth_string.encode('utf-8')
        auth_b64 = base64.b64encode(auth_bytes).decode('utf-8')

        # トークンをリクエスト
        response = requests.post(
            f"https://{MALL_ID}.cafe24api.com/api/v2/oauth/token",
            data={
                'grant_type': 'authorization_code',
                'code': code,
                'redirect_uri': REDIRECT_URI
            },
            headers={
                'Authorization': f'Basic {auth_b64}',
                'Content-Type': 'application/x-www-form-urlencoded'
            }
        )

        token_data = response.json()

        # トークンを保存
        session['tokens'] = {
            'access_token': token_data['access_token'],
            'refresh_token': token_data['refresh_token'],
            'expires_at': token_data['expires_at'],
            'refresh_token_expires_at': token_data['refresh_token_expires_at']
        }

        session['user'] = {
            'mall_id': token_data['mall_id'],
            'user_id': token_data['user_id'],
            'shop_no': token_data['shop_no'],
            'scopes': token_data['scopes']
        }

        session.modified = True

        return redirect('/dashboard')
    except Exception as e:
        print(f"Token exchange error: {e}")
        return jsonify({'error': 'Failed to get access token'}), 400
🎯 Step 3: API呼び出し
概要
発行されたAccess Tokenを使ってCAFE24 APIを呼び出します。
Authorizationヘッダー
すべてのAPIリクエストでAccess TokenをBearerトークン形式で指定します。
Authorization: Bearer {access_token}
リクエスト例
商品一覧の取得
curl -X GET \\
  'https://yourmall.cafe24api.com/api/v2/admin/products' \\
  -H 'Authorization: Bearer 0iqR5nM5EJIq..........' \\
  -H 'Content-Type: application/json'
注文の作成
curl -X POST \\
  'https://yourmall.cafe24api.com/api/v2/admin/orders' \\
  -H 'Authorization: Bearer 0iqR5nM5EJIq..........' \\
  -H 'Content-Type: application/json' \\
  -d '{
    "customer_name": "山田太郎",
    "customer_email": "yamada@example.com",
    "items": [
      {
        "product_no": 128,
        "quantity": 2
      }
    ]
  }'
実装例
Node.js/Express
async function makeApiRequest(endpoint, method = 'GET', data = null) {
  const { access_token } = req.session.tokens;

  const config = {
    method,
    url: `https://${MALL_ID}.cafe24api.com/api/v2/admin${endpoint}`,
    headers: {
      'Authorization': `Bearer ${access_token}`,
      'Content-Type': 'application/json'
    }
  };

  if (data) {
    config.data = data;
  }

  try {
    const response = await axios(config);
    return response.data;
  } catch (error) {
    if (error.response?.status === 401) {
      // トークン期限切れ、リフレッシュが必要
      throw new Error('Token expired');
    }
    throw error;
  }
}

// 利用例
app.get('/api/products', async (req, res) => {
  try {
    const products = await makeApiRequest('/products');
    res.json(products);
  } catch (error) {
    res.status(500).json({ error: error.message });
  }
});
🔄 トークン再発行(Refresh)
概要
Access Tokenは2時間で期限切れになります。 Refresh Tokenを使って新しいAccess Tokenを発行できます。
注意事項
- Refresh Tokenの有効期間: 2週間
- 自動再発行: Refresh Token失効前にリクエストすると、新しいRefresh Tokenも返却されます
- 以前トークンの失効: 新しいトークン発行時に、以前のRefresh Tokenは自動的に失効します
リクエスト
curl -X POST \\
  'https://{mall_id}.cafe24api.com/api/v2/oauth/token' \\
  -H 'Authorization: Basic {base64_encode({client_id}:{client_secret})}' \\
  -H 'Content-Type: application/x-www-form-urlencoded' \\
  -d 'grant_type=refresh_token&refresh_token={refresh_token}'
成功レスポンス(200 OK)
{
  "access_token": "21EZes0dGSfN..........",
  "expires_at": "2021-03-01T15:50:00.000",
  "refresh_token": "xLlhWztQHBik............",
  "refresh_token_expires_at": "2021-03-15T13:50:00.000",
  "client_id": "BrIfqEKoPxeE..........",
  "mall_id": "yourmall",
  "user_id": "test",
  "scopes": ["mall.read_order", "mall.read_product", "mall.read_store"],
  "issued_at": "2021-03-01T13:50:00.000",
  "shop_no": "1",
  "token_type": "Bearer"
}
実装例 - 自動リフレッシュロジック
Node.js/Express - ミドルウェア
const Base64 = require('js-base64').Base64;

// トークン再発行関数
async function refreshAccessToken(refreshToken) {
  try {
    const auth = Base64.encode(`${CLIENT_ID}:${CLIENT_SECRET}`);

    const response = await axios.post(
      `https://${MALL_ID}.cafe24api.com/api/v2/oauth/token`,
      `grant_type=refresh_token&refresh_token=${refreshToken}`,
      {
        headers: {
          'Authorization': `Basic ${auth}`,
          'Content-Type': 'application/x-www-form-urlencoded'
        }
      }
    );

    return response.data;
  } catch (error) {
    console.error('Token refresh error:', error.response?.data);
    throw error;
  }
}

// ミドルウェア - トークン自動リフレッシュ
app.use(async (req, res, next) => {
  // トークンが無ければスキップ
  if (!req.session.tokens) {
    return next();
  }

  const { access_token, refresh_token, expires_at } = req.session.tokens;
  const now = new Date();
  const expiresDate = new Date(expires_at);

  // トークン期限切れ5分前にリフレッシュ
  const refreshThreshold = new Date(expiresDate.getTime() - 5 * 60 * 1000);

  if (now > refreshThreshold) {
    try {
      const newTokens = await refreshAccessToken(refresh_token);
      req.session.tokens = {
        access_token: newTokens.access_token,
        refresh_token: newTokens.refresh_token,
        expires_at: new Date(newTokens.expires_at),
        refresh_token_expires_at: new Date(newTokens.refresh_token_expires_at)
      };
      console.log('Token refreshed successfully');
    } catch (error) {
      console.error('Token refresh failed, logging out user');
      req.session.destroy();
      return res.redirect('/login');
    }
  }

  next();
});
Python/Flask
def refresh_access_token(refresh_token):
    """Refresh Tokenを使って新しいAccess Tokenを発行する"""
    try:
        auth_string = f"{CLIENT_ID}:{CLIENT_SECRET}"
        auth_bytes = auth_string.encode('utf-8')
        auth_b64 = base64.b64encode(auth_bytes).decode('utf-8')

        response = requests.post(
            f"https://{MALL_ID}.cafe24api.com/api/v2/oauth/token",
            data={
                'grant_type': 'refresh_token',
                'refresh_token': refresh_token
            },
            headers={
                'Authorization': f'Basic {auth_b64}',
                'Content-Type': 'application/x-www-form-urlencoded'
            }
        )

        return response.json()
    except Exception as e:
        print(f"Token refresh error: {e}")
        raise

# Flask before_request - トークン自動リフレッシュ
@app.before_request
def check_and_refresh_token():
    if 'tokens' not in session:
        return

    try:
        expires_at = datetime.fromisoformat(session['tokens']['expires_at'].replace('Z', '+00:00'))
        refresh_threshold = expires_at - timedelta(minutes=5)

        if datetime.now(timezone.utc) > refresh_threshold or datetime.now() > expires_at.replace(tzinfo=None):
            new_tokens = refresh_access_token(session['tokens']['refresh_token'])
            session['tokens'] = {
                'access_token': new_tokens['access_token'],
                'refresh_token': new_tokens['refresh_token'],
                'expires_at': new_tokens['expires_at'],
                'refresh_token_expires_at': new_tokens['refresh_token_expires_at']
            }
            session.modified = True
            print('Token refreshed successfully')
    except Exception as e:
        print(f'Token refresh failed: {e}')
        session.clear()
        return redirect('/login')
🛑 トークンの失効(Revoke)
概要
ユーザーがログアウトしたり、APIアクセスが不要になった場合に、明示的にトークンを失効させることができます。
注意事項
- Access Tokenを失効させると、関連するRefresh Tokenも併せて失効します
- 失効したトークンを使ったAPI呼び出しは401 Unauthorizedエラーになります
リクエスト
curl -X POST \\
  'https://{mall_id}.cafe24api.com/api/v2/oauth/revoke' \\
  -H 'Authorization: Basic {base64_encode({client_id}:{client_secret})}' \\
  -H 'Content-Type: application/x-www-form-urlencoded' \\
  -d 'token={token}&token_hint={token_hint}'
パラメータ
| パラメータ | 説明 | 例 |
|---|---|---|
token | 失効させるトークン(AccessまたはRefresh) | 0iqR5nM5EJIq.. |
token_hint | トークンの種別 | access_token または refresh_token |
実装例
Node.js/Express
async function revokeToken(token, tokenHint = 'access_token') {
  try {
    const auth = Base64.encode(`${CLIENT_ID}:${CLIENT_SECRET}`);

    await axios.post(
      `https://${MALL_ID}.cafe24api.com/api/v2/oauth/revoke`,
      `token=${token}&token_hint=${tokenHint}`,
      {
        headers: {
          'Authorization': `Basic ${auth}`,
          'Content-Type': 'application/x-www-form-urlencoded'
        }
      }
    );

    console.log(`${tokenHint} revoked successfully`);
  } catch (error) {
    console.error('Token revoke error:', error.response?.data);
    throw error;
  }
}

// ログアウトエンドポイント
app.get('/logout', async (req, res) => {
  try {
    if (req.session.tokens) {
      // Access Tokenを失効
      await revokeToken(req.session.tokens.access_token, 'access_token');
    }

    req.session.destroy();
    res.redirect('/login');
  } catch (error) {
    console.error('Logout error:', error);
    // トークン失効に失敗してもセッションは破棄
    req.session.destroy();
    res.redirect('/login');
  }
});
📡 API別の認証方式
Admin API(OAuth 2.0)
認証方式: Bearer Token
curl -X GET \\
  'https://yourmall.cafe24api.com/api/v2/admin/products' \\
  -H 'Authorization: Bearer {access_token}' \\
  -H 'Content-Type: application/json'
要件:
- OAuth 2.0認証が必要
- Access Tokenが必要
Front API(Client IDベース)
認証方式: Client IDヘッダー
curl -X GET \\
  'https://yourmall.cafe24api.com/api/v2/products' \\
  -H 'X-Cafe24-Client-Id: {client_id}' \\
  -H 'Content-Type: application/json'
要件:
- OAuth 2.0認証は不要
- Client IDのみ必要
Cafe24 Analytics API(OAuth 2.0)
認証方式: Bearer Token
curl -X GET \\
  'https://ca-api.cafe24data.com/visitors/pageview' \\
  -H 'Authorization: Bearer {access_token}' \\
  -H 'Content-Type: application/json'
🛡️ セキュリティのベストプラクティス
1. Client Secretの保護
// ✅ 環境変数を利用
const CLIENT_SECRET = process.env.CAFE24_CLIENT_SECRET;

// .envファイル
CAFE24_CLIENT_ID=BrIfqEKoPxeE
CAFE24_CLIENT_SECRET=xYz789

// .gitignoreに追加
echo ".env" >> .gitignore
2. HTTPSの必須化
// ✅ 必ずHTTPSを使う
const redirectUri = 'https://yourapp.com/callback';
3. State値でCSRFを防止
const crypto = require('crypto');
const state = crypto.randomBytes(32).toString('hex');
session.oauthState = state;

// コールバックで検証
if (req.query.state !== session.oauthState) {
  throw new Error('CSRF attack detected');
}
4. トークンの保管方法
サーバーセッション(推奨)
// トークンはサーバーセッションのみに保管
req.session.tokens = {
  access_token: token.access_token,
  refresh_token: token.refresh_token,
  expires_at: token.expires_at
};
データベース保存(暗号化)
CREATE TABLE user_tokens (
  id INT PRIMARY KEY,
  user_id VARCHAR(255),
  access_token VARCHAR(255) ENCRYPTED,
  refresh_token VARCHAR(255) ENCRYPTED,
  expires_at DATETIME,
  created_at TIMESTAMP DEFAULT CURRENT_TIMESTAMP
);
5. トークン期限切れの処理
// トークン期限切れの判定
const isTokenExpired = (expiresAt) => {
  return new Date() > new Date(expiresAt);
};
6. 権限の検証(Scopeチェック)
const requiredScopes = ['mall.read_product', 'mall.write_order'];
const grantedScopes = tokens.scopes;

const hasAllScopes = requiredScopes.every(scope =>
  grantedScopes.includes(scope)
);

if (!hasAllScopes) {
  throw new Error('Insufficient permissions');
}
🐛 エラーハンドリングとトラブルシューティング
401 Unauthorized
症状: "error": "invalid_grant" または "error": "invalid_token"
原因:
- Authorization Codeの期限切れ(1分以内に使用する必要あり)
- Authorization Codeの再利用
- 誤ったClient ID/Secret
- トークン期限切れ
対処方法:
// トークン再発行を試みる
if (error.response?.status === 401) {
  try {
    const newTokens = await refreshAccessToken(refresh_token);
    // 新しいトークンでリトライ
  } catch (refreshError) {
    // リフレッシュ失敗、再ログインが必要
    res.redirect('/login');
  }
}
400 Bad Request
症状: "error": "invalid_request"
原因:
- 必須パラメータの欠落
- 不正なredirect_uri
- Content-Typeエラー
対処方法:
// すべての必須パラメータを確認
const requiredParams = ['grant_type', 'code', 'redirect_uri'];
const hasAllParams = requiredParams.every(param => data[param]);

if (!hasAllParams) {
  throw new Error('Missing required parameters');
}
403 Forbidden
症状: Scope権限の不足
原因:
- リクエストしたScopeが承認されていない
- ユーザーが同意時に特定権限を拒否した
対処方法:
// 必要なScopeを確認
const requiredScopes = ['mall.read_product', 'mall.write_order'];
const missingScopes = requiredScopes.filter(
  scope => !tokens.scopes.includes(scope)
);

if (missingScopes.length > 0) {
  console.log(`Missing scopes: ${missingScopes.join(', ')}`);
  // 再認証が必要
  res.redirect('/login');
}
✅ 本番環境チェックリスト
開発フェーズ
- ローカル開発環境でOAuthフローをテストした
- localhostでRedirect URIをテストした
- State値の検証を実装した
- トークン保管メカニズムを実装した
- エラーハンドリングロジックを実装した
セキュリティレビュー
- Client Secretは環境変数にのみ保管されている
- .envファイルは.gitignoreに含まれている
- HTTPSが適用されている
- トークンはサーバーセッションにのみ保管されている
- CSRFトークン(State)の検証を実装した
- トークン期限切れ処理を実装した
APIテスト
- Authorization Codeの発行をテストした
- Access Tokenの発行をテストした
- API呼び出しをテストした(全Scope)
- トークン再発行をテストした
- トークン失効をテストした
- Scope権限検証をテストした
デプロイ前
- Redirect URIを本番URLに変更した
- デベロッパーセンターでRedirect URIの登録を確認した
- 環境変数設定を確認した
- HTTPS証明書を確認した
- エラーロギングを設定した
- トークン再発行ロジックをテストした
モニタリング
- トークン期限切れ問題を監視している
- API呼び出し失敗をログ収集している
- Unauthorizedエラーをトラッキングしている
- トークン再発行の成功/失敗率を監視している
📚 追加リソース
🤝 サポート
問題が発生した場合:
- このガイドのトラブルシューティングセクションを確認
- APIドキュメント